Microsoft has finally released the Windows 11 23H2 update for the general public. However, it will take a few more weeks or months for the company to begin the rollout process. If you cannot wait that long to have a feel of the new features available to your PC, this article is for you. It will also be useful to users who will not receive the update prompt even after Microsoft rolls out the update. This guide will help you do it yourself without asking for the help of any I.T specialist.
What’s New in Windows 11?
In late September 2023, Windows 11 received an update known as Windows 11 23H2. This update brings improved security, bug fixes, and new features to the operating system. One notable addition is Windows Copilot, a helpful tool that’s currently available in select regions but will expand to more areas in the future. The update aims to enhance the overall performance and security of Windows 11, addressing common issues and introducing new features to provide a better user experience. Keeping your system up to date with these improvements is essential.
You may need to wait for the Windows 11 23H2 update to reach your computer if you rely on Microsoft’s standard protocols. However, you can speed up the process by following these three simple methods to request and install the update at your convenience.
Guide to Install Windows 11 23H2 Via Windows Settings

Microsoft’s rollout protocols for major updates can be a bit mysterious, but there is one setting that can trigger the installation of Windows 11 23H2.
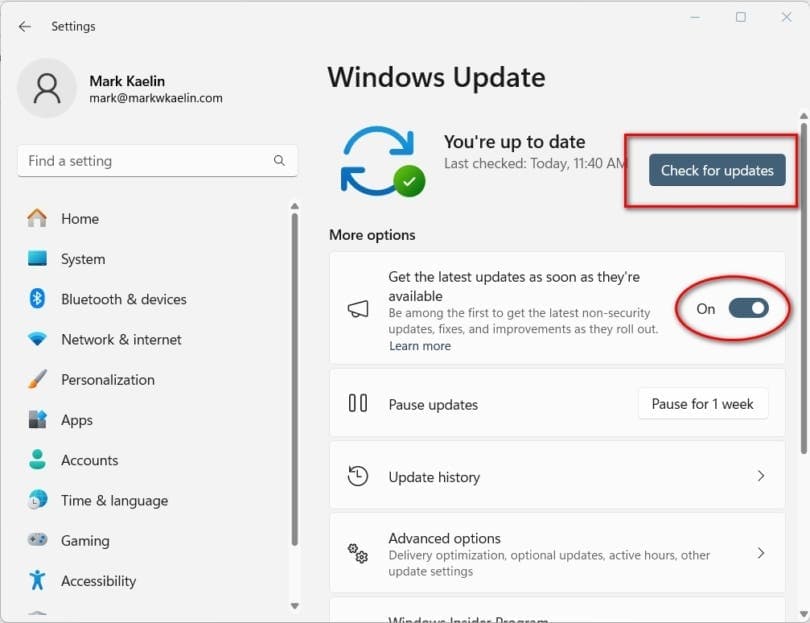
- Press the Windows Kay together with the “I” key to open Windows Settings. Select Windows Update from the left pane.
- Turn on the setting that says, “Get the Latest Updates as Soon as They’re Available” and then click the “Check For Updates” button.
This simple step may be enough to initiate the Windows 11 23H2 update installation. You may see a new entry for 23H2 after a short wait, and you can click “Download And Install” to begin.
Keep in mind that this method may not always produce the desired result due to the unpredictability of Microsoft’s update procedures.
Using Installation Assistant to Install Windows 11 23H2

If you want a more reliable way to install Windows 11 update 23H2 on a single PC, you can use Microsoft’s Installation Assistant. Here’s how:
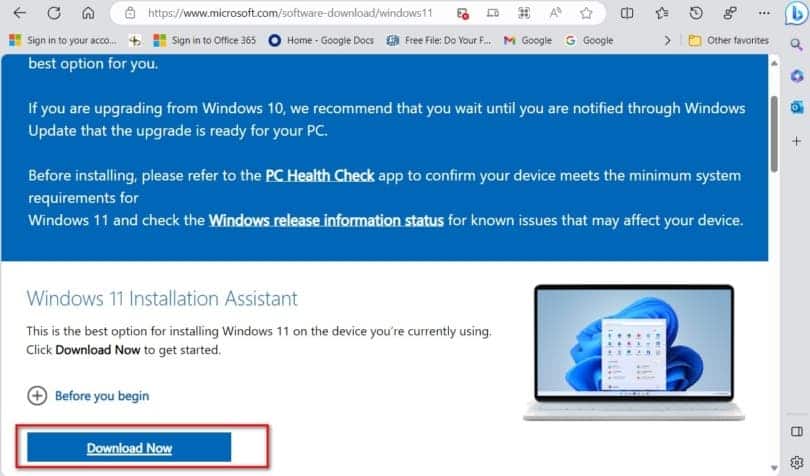
1. Open your web browser and go to the Windows 11 download support website.
2. Look for the “Windows 11 Installation Assistant” section and click the “Download Now” button.
Once the download is complete, double-click the Windows11InstallationAssistant.exe file and follow the on-screen instructions. The Microsoft Installation Assistant will take care of the installation, upgrading your system to the new Windows 11 23H2 version while keeping your files, settings, and applications intact.
Using Media Creation Tool to Install Windows 11 23H2

For situations where you need to install Windows 11 23H2 on multiple computers, especially for small or medium-sized businesses, the Media Creation Tool is the ideal solution. It allows you to create a reusable USB drive to update each PC.
To get started, open your preferred web browser and go to the Windows 11 download support website. Scroll down the page until you locate the “Download Now” button under the “Create Windows 11 Installation Media” section.
Once the download is finished, double-click the MediaCreationToolW11.exe file and proceed with the instructions. Note that you’ll require a USB drive with at least 8 GB of free space to complete the process. Alternatively, you can create a DVD compact disk instead of using a USB drive.
After successfully creating the installation USB drive, insert it into a PC and double-click the setup.exe file found on the drive. Follow the on-screen instructions, and the update to Windows 11 23H2 will commence.
Follow Gizchina.com on Google News for news and updates in the technology sector.


