
When you first install Windows PC, it starts up at fast speed and works quickly. But after you install updates and new software, it might start feeling slower. There are ways to check if it's just a feeling or if your computer is really slowing down. Use tools to check how long it takes for your system to start, and fix anything that might be slowing it down. Measure the start times before and after making changes to see if the improvements worked.
When you see the desktop on Windows, the startup isn't finished. The system might not respond to your clicks or might be slow. The time it takes depends on the programs starting after login. To speed things up, reduce the number of programs that start automatically. It can be frustrating if Windows is installing updates when you quickly want to check something online. To avoid this, you can temporarily stop updating installations. Another option is to set a timer or use the network to start the PC, so it's ready when you need it. (Source).
Tip 1 - Check How Long Your System Takes To Boot Up

Windows keeps logs of start times and processes that may delay startup in the Event Viewer. Some delays, like those caused by virus scanners, are unavoidable. To check system startup and shutdown times on Windows, access the event log by right-clicking the Start menu button, selecting Event Viewer, and navigating to Application and service logs > Microsoft > Windows > Diagnostics-Performance > Operational.
In the Event Viewer window, events related to Windows startup (Event IDs 100-199) and shutdown (Event IDs 200 onwards) are displayed in the center. To determine the time taken for startup or shutdown, check the lower area for Startup duration (for IDs 100) and Shutdown duration (for IDs 200), specified in milliseconds. IDs 101 to 199 in the Event Viewer provide additional details about the specific area affected during startup. Clicking on a message reveals a brief description of the issue under General, along with the name of the software responsible for the delay. For shutdown issues, Windows logs IDs from 201 to 299.
Tip 2 -Turn Off System "Brakes" to Speed up Windows PC
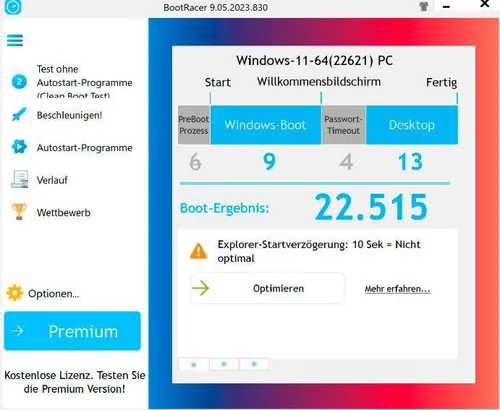
Bootracer is a helpful tool to assess boot times and identify the duration taken by autostart programs. It provides insights into the time consumed by each program, allowing you to deactivate unnecessary ones, thus optimizing system performance.
In Bootracer, select Test > Complete Windows startup process and click Start test. Confirm the restart with Yes. After the desktop appears, Bootracer will show a progress bar, indicating the seconds for the entire boot process. The window with the total start time can be clicked for more details. In Bootracer, check the window for Windows boot and Desktop times.
Perform a Clear Boot Test by clicking Test without autostart programs, then Start test. Click the total time; the Desktop value should be lower. Explore Autostart programs to see active programs and their start times. Uncheck unnecessary programs or those causing significant slowdown in Windows startup.
Tip 3 - Remove Unnecessary Apps from Windows Startup to Speed Up Your PC
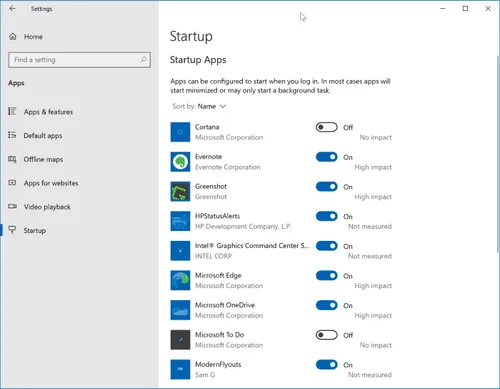
Remove programs from Startup apps in Task Manager to improve Windows startup. In Windows 10, access the Startup apps tab via More details. In Windows 11, use the Startup apps section. Check the Startup impact column to gauge a program's effect on Windows and remove it if needed through the context menu.
Task Manager displays the time taken for Windows to start after turning on the computer, indicated by Last BIOS time (available in UEFI mode). Activate Fast Boot or Quick Boot in the firmware/BIOS setup to shorten this time by skipping certain hardware checks and expediting the boot process.
Tip 4 - Enable Auto-Login on Windows
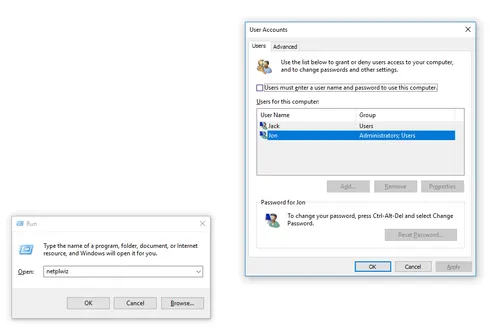
Windows defaults to requesting a password upon login. If you primarily use your PC at home, you might consider enabling automatic login. For Windows 10 and 11, this involves a registry adjustment. Press Win+R, enter regedit, and confirm with OK. Navigate to the following key:
and change the value DevicePasswordLessBuildVersion to 0. Now, press Win+R again and input the following:
Remove the tick in front of "Users must enter username and password" and click on Apply. Then enter the username of your local standard account and the corresponding password twice. Next, click OK twice, and Windows will start without asking for a password. Automatic login also works with a Microsoft account. After "Username," use the email address that you use for logging in.
Tip 5: Use a Timer Switch
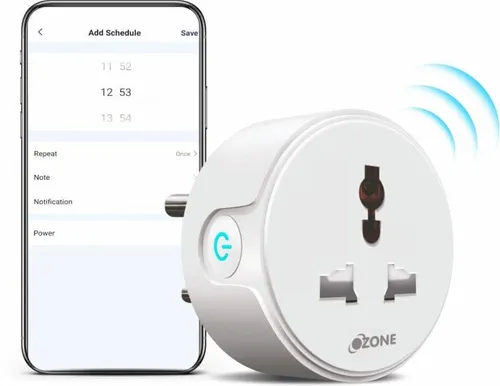
Computers, screens, and other devices can use electricity and cost money, even when turned off or on standby. So, it's a good idea to unplug them using a switch when you're not using them to save energy and reduce costs.
If you have a specific time for using your PC daily, you can use a timer switch. These come in mechanical or digital options, ranging from $6 to $25. Alternatively, a smart socket, costing less than $50, is even more convenient. It lets you control a connected power strip manually through your smartphone or set up a schedule.
To ensure that the desktop PC starts up automatically when the power supply is activated, you need to change a setting in the firmware/BIOS setup. To do this, click the On/Off button at the bottom right of the Windows login screen or, after logging in, click the On/Off button in the Start menu. Hold down the Shift key and click on Restart in the button menu. Go to Troubleshooting > Advanced Options > UEFI Firmware Settings and click on the Restart button. In the firmware/BIOS setup, search for a menu item such as Power Management Setup or Platform Power. For options such as Restore after AC Power Loss or AC Back, activate Power on, Always on, or similar
Tip 6: How to Start Windows Automatically
To make your desktop PC start automatically when the power is turned on, follow these steps:
1. Click the On/Off button at the bottom right of the Windows login screen or, after logging in, click the On/Off button in the Start menu.
2. Hold down the Shift key and click on Restart in the button menu.
3. Navigate to Troubleshooting > Advanced Options > UEFI Firmware Settings and click on the Restart button.
4. In the firmware/BIOS setup, look for a menu item like Power Management Setup or Platform Power.
5. Find options such as Restore after AC Power Loss or AC Back and activate Power on, Always on, or a similar option.
To set up your computer to start automatically before you work, follow these steps:
1. Shut down Windows.
2. Disconnect the PC from the power supply.
3. When the power supply is restored, the computer will turn on automatically, and Windows will start.
4. If you use a timer to schedule the switch-on time just before you start working, the computer will be ready for use when you need it.
2. Disconnect the PC from the power supply.
3. When the power supply is restored, the computer will turn on automatically, and Windows will start.
4. If you use a timer to schedule the switch-on time just before you start working, the computer will be ready for use when you need it.
Tip 7: Update Your PC Automatically
You can also enable automatic startup without a timer. Many desktop PCs offer an option like "Resume by Alarm" in the firmware setup (refer to point 7). This feature allows you to configure a timer, such as a daily auto-start at the beginning of your work. However, usually, specific days of the week cannot be selected. The computer will turn on at the chosen time, regardless of whether you shut down Windows or put it to sleep.
Tip 8: Turn on your PC Remotely
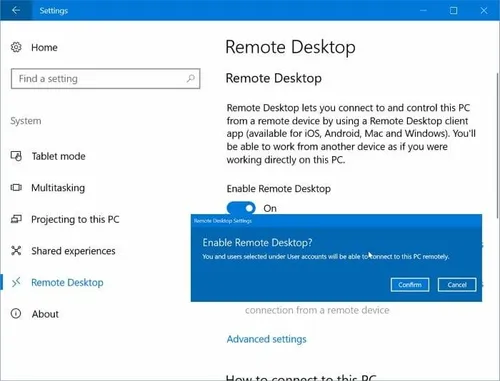
If you prefer not to set a fixed schedule for starting your system, you can activate the computer at your desired time using Wake-on-LAN (WOL) via your smartphone, for example. While Wake-on-LAN was originally developed for Ethernet adapters, it can also work with some WLAN chipsets in notebooks if the firmware supports it.
To enable Wake-on-LAN, follow these steps:
1. In the firmware/BIOS setup (refer to point 7), set all Wake-on-LAN options to Enabled, if available.
2. Under Windows, open the Device Manager.
3. In the context menu of the network adapter, go to Properties.
4. Click on the Advanced tab, where you'll find options like Wake on magic package, Wake on pattern match, Activation by magic packet, or similar.
5. Activate all options related to Wake on LAN.
6. Go to the Power Management tab and tick the three available options.
Tip 10: Switch from HDD To SSD

Booting Windows from an SSD significantly improves performance, thanks to shorter access times. This boost is worthwhile even for older PCs and notebooks. You can use AS SSD Benchmark to assess the speed of hard disks and SSDs. To migrate the system from a hard drive to an SSD, Hasleo Backup Suite Free is a helpful tool.
If you stick with a hard drive, occasional defragmentation is recommended. Auslogics Disk Defrag is a useful tool for defragmenting large files, such as those from games or virtualization software, to speed up access.
Conclusion
In conclusion, maintaining optimal Windows performance involves strategic measures. Upgrading to an SSD can notably enhance speed, while tools like AS SSD Benchmark aid in evaluating disk performance. Properly configuring system startup, leveraging Wake-on-LAN, and selectively managing autostart programs contribute to efficient operation. Regular defragmentation and device disconnection when not in use are additional practices for sustained performance. Monitoring and adjusting Windows startup settings, updating judiciously, and utilizing timer switches complete a comprehensive approach to ensure a smooth and responsive computing experience.
Loading

