Harnessing the capabilities of the Music app on your Mac, Smart Playlists offer a dynamic way to curate your music collection. These playlists automatically update based on criteria you set during their creation. It ensures that they remain relevant and tailored to your preferences over time. The process of crafting a Smart Playlist is intuitive and free, allowing you to create as many as you desire without limitations. (Via: DigitalTrends).
What Are Apple Smart Playlists?
Smart Playlists on Apple devices, including Macs, offer a sophisticated way to manage your music library. These playlists are not static; instead, they dynamically update based on criteria you specify. This criterion can include various parameters such as song title, artist, genre, play count, date added, and more.
One of the notable features of Smart Playlists is their adaptability. As your music library evolves, Smart Playlists automatically adjust to reflect these changes. For example, if you add new songs to your library that meet the criteria set for a Smart Playlist, those songs will be automatically included the next time you open the playlist.
Furthermore, Smart Playlists allow for complex filtering and organization. You can combine multiple criteria using logical operators (such as AND, and OR) to create highly specific playlists tailored to your preferences. For instance, you can create a Smart Playlist that includes all songs added in the last month from a specific genre and with a play count greater than 10.

To guide you effectively, we’ve developed an in-depth tutorial on how to create and tailor Smart Playlists according to your preferences.
Creating a Smart Playlist in Music on Mac
- Step 1: Launch the Music app on your Mac to initiate the process.
- Step 2: Access the menu bar and select “File” > “New.” From the dropdown menu, opt for “Smart Playlist”.
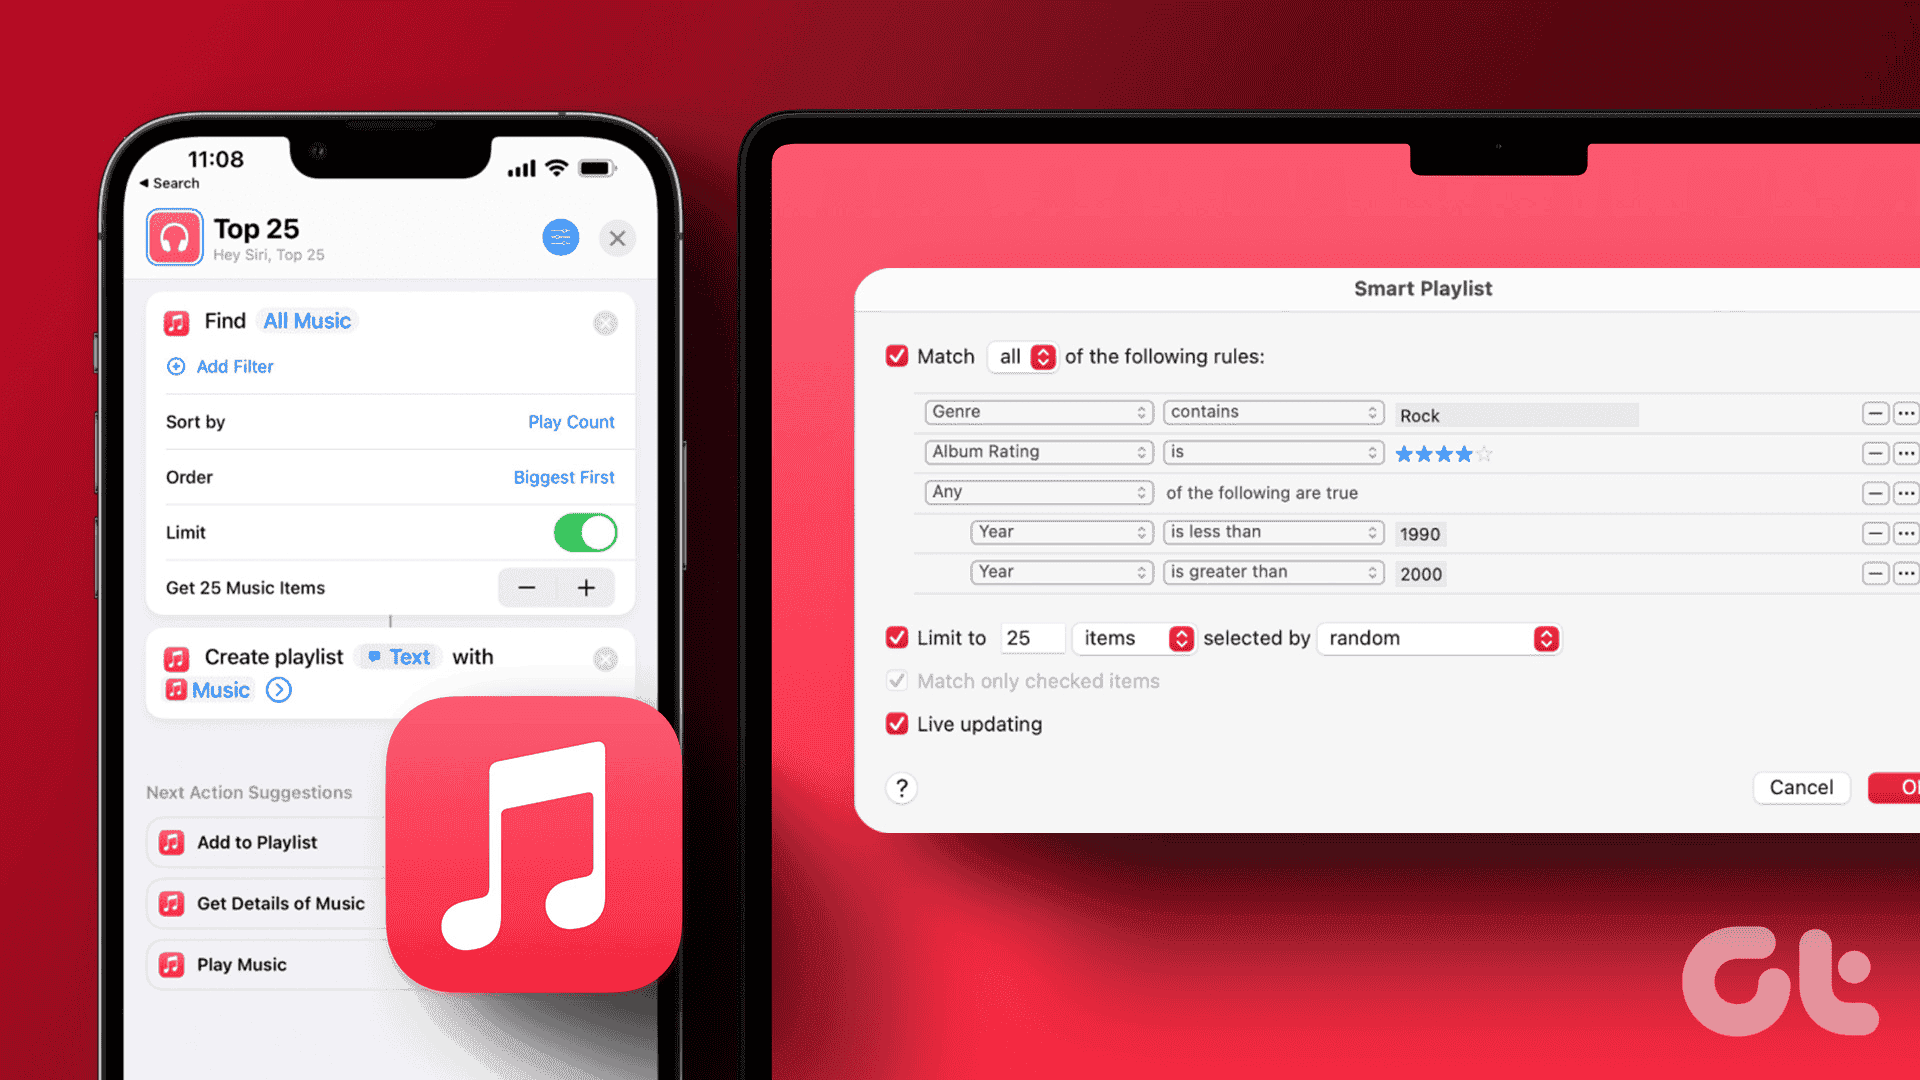
- Step 3: As the Smart Playlist setup window materializes, ensure the checkbox labeled “Match the following rule” is selected. This critical step empowers you to define the criteria that will govern your playlist’s content.
- Step 4: In the Smart Playlist setup window, utilize the first drop-down box on the left to select the initial condition for your playlist. This offers a multitude of options! It ranges from artist and genre to date added, love status, purchase history, year, and more.
- Step 5: Following your initial selection, utilize the drop-down box to the right to specify the condition further. Options include “Contains,” “Begins With,” “Is After,” “Is Not,” and others, which vary based on your selection in the first drop-down box. This step allows you to fine-tune the criteria for your Smart Playlist to precisely match your preferences.
- Step 6: Subsequently, you may be prompted to input additional details into a text box, drop-down list, or calendar, depending on your previous selections. This step is crucial for refining the criteria of your Playlist to precisely match your preferences and needs.
The Smart Playlist can Reflect your Desired Parameters
- For example, if you opt for “Artist” > “Contains,” you will enter the name of the artist. Similarly, if you select “Date added” > “Is before,” you would specify the date accordingly. These additional inputs ensure that your Playlist accurately reflects your desired parameters and delivers the desired music selection.
- Step 7: Once you have added all your criteria, you have the option to check additional boxes to further customize your playlist. These options include limiting the number of items in the playlist, specifying how they are selected, matching only checked items, and enabling live updating to ensure the playlist stays current. After customizing your playlist to your satisfaction, click “OK” to save your Smart Playlist rules. This final step completes the creation process, and your Smart Playlist is now ready for use in the Music app on your Mac.
- Step 8: Your newly created Playlist will appear in the main section of the Music app. To finalize its creation, enter a name for the playlist in the designated field and press “Return.” You can then immediately start enjoying your new Smart Playlist. As you interact with the Music app, such as listening to music, purchasing songs, or adding new items to your library, any items that meet the criteria you established for your Smart Playlist will be automatically included in it. This ensures that your playlist remains dynamic and continuously updates to reflect your evolving music preferences and habits.
Access and Edit your Smart Playlist
Accessing and editing your Smart Playlist on a Mac is as straightforward as creating it.
- Step 1: To access and play your newly created Smart Playlist, navigate to the Playlists section. It is in the left-hand menu of the Music app. Simply select your Smart Playlist from the list. Now, you can start enjoying the curated selection of songs.
- Step 2: If you sync your Music app with your iPhone or iPad, you’ll find the Smart Playlist conveniently located in the Playlists section of the Library on those devices too. This allows you to seamlessly access and enjoy your curated music collection across all your Apple devices.
- Step 3: To make changes to your Playlist, simply open the Music app on your Mac. Select the playlist you wish to edit, then click on “Edit rules” located below the playlist name on the right-hand side. Once you enter the editing mode, you’ll see the rules you initially set up for the playlist. From here, you can make any modifications or adjustments as needed. After making your changes, click “OK” to save them, and your playlist will be updated accordingly.
My Smart Playlist Appears Empty
If your Smart Playlist appears empty, there’s no need to panic as there’s likely a simple solution to the issue. It’s possible that inadvertently clicking the wrong button during the playlist creation process may have caused this.
To rectify this, start by accessing the settings of your Smart Playlist. If you’ve applied “match all” or “match any” filters, try resetting them, even if they seem to be configured correctly. Often, a simple refresh like this can restore your Smart Playlist to its intended state.
The Genius Playlist
Now, let’s delve into Genius playlists. Unlike Smart Playlists, which utilize user-defined criteria. It automatically populates songs, artists, and albums. The Genius playlists are curated by Apple’s Genius tool, which groups similar songs.
To create a Genius playlist in the macOS Music app, begin by playing a song. Then, navigate to File > New > Genius Playlist. The Music app will automatically compile a playlist featuring songs with similar characteristics.
Furthermore, Genius Shuffle is an extension of the Genius tool that assists users in discovering music. If you’re indecisive about what genre of music to listen to, Genius Shuffle randomly selects a song and pairs it with similar-sounding tracks.
Now that you’ve mastered the art of creating Smart Playlists in Apple Music for automated music updates, consider exploring how to share your Apple Music library to enhance your music experience.
Conclusion</h2>
In conclus