
Although you can get an Apple iPhone with up to 1 TB of storage, these higher-end storage options are generally pricey. So, most people get a 256 GB option. And while 256 GB may seem like a lot, it can get full pretty quickly, especially if you click a lot of photos. But if you have an iPad or are planning to get one, you might be wondering, “how do I transfer photos from iPhone to iPad?” There’s an easy solution to clean your iPhone storage a little. All you need to do is learn how to transfer photos from iPhone to iPad.
Yes, you may have already seen suggestions in the Apple community about moving the photos from iPhone to PC first and then to iPad. While this process may seem simple, you need to know the correct method to avoid data loss. So, if you’re pondering, “how do I transfer photos from PC to iPad?” it’s crucial to follow the right steps.
If you do go through that route, you should also know how to transfer the photos back from your iPad to your PC and to your Apple iPhone. Hence, if you’re questioning, “how do I transfer photos from iPad to PC?” or “how do I transfer photos from iPad back to iPhone?” it’s essential to grasp the entire process. So, to make things easier for you, we have decided to share everythingthat you would want to know about how to transfer photos from iPhone to iPad. Let’s not keep you waiting anymore and get right into it, shall we?
Method 1. How to Transfer Photos From iPhone to iPad in 1 Click With iCareFone
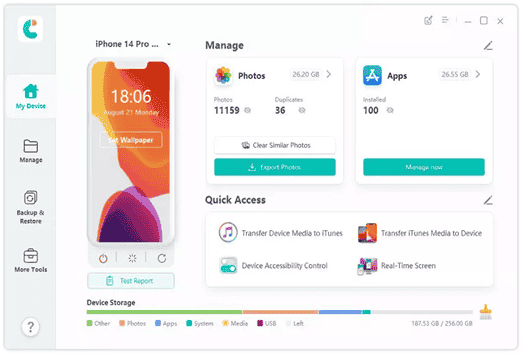
The fastest way to learn how to transfer photos from iPhone to iPad without iCloud is through a third-party tool like Tenorshare iCareFone. It can move your photos from your iPhone to your iPad and vice versa in one click. The best part about this tool is you can choose what to transfer to your iPad. Check out what more amazing functions iCareFone brings to you:
- Easy to use.
- iPad to iPhone photo transfer, move pictures from iPad to iPhone, and also between various iOS devices.
- Transfer photos from computer to iOS devices and vice versa.
- Quick transfer with 3000 photos in just 5 minutes, and up to 10 times faster than from iCloud.
- Customize your output settings easily (like converting iPhone photos to JPG).
- Fast conversion speed, efficient, and stable performance.
- Supports 18+ data types like photos, videos, contacts, messages, and documents.
- Transfer media files between iOS devices and iTunes without limits.
- Compatible with iOS 17 and iPhone models up to latest versions.
Here’s how to transfer photos from iPad to iPhone and vice versa with help of Tenorshare iCareFone:
Step 1: Download iCareFone and connect your iPhone (or iPad) to your computer. Click “Manage” to start syncing.
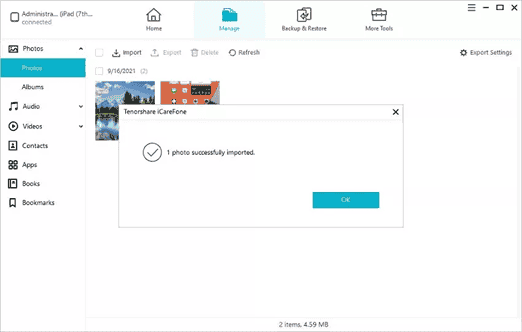
Step 2: The tool will then scan your iPhone (or iPad) data. Choose pictures you want to send from list on left. Click “Export” to transfer them to your computer.

Step 3: Disconnect your iPhone (or iPad) and connect your iPad (or iPhone) to computer. Click “Manage” and then “Import.” Wait for iCareFone to move photos from your computer to your iPad (or iPhone).
Note: If the files you want to move aren’t listed, use “Backup & Restore” to back up iPhone (or iPad) files and then restore them to your iPad (or iPhone.)
Method 2. How to Get Photos From iPhone to iPad via iCloud
Don’t want to use a computer or don’t have a computer at hand? You can learn how to share photos from iPhone to iPad with help of iCloud. It is a cloud server that’s created by Apple for iOS devices to back up and manage data. iCloud also offers a way to move pictures from your iPhone to your iPad. Here’s how to download pictures from iPhone to iPad using iCloud:
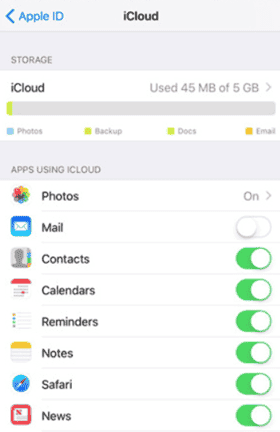
Step 1: Head to “Settings” on your iPhone and choose “iCloud.” Then, sign in with your Apple ID.
Step 2: Tap on “Photos” app in your iPhone to switch it on. Repeat same steps on iPad and this will sync photos between both iOS devices.
Method 3. How to Transfer Photos From iPhone to iPad Wirelessly-AirDrop
If you want to learn how to send pictures from iPhone to iPad wirelessly, use AirDrop, a feature on Apple devices for sharing files wirelessly with nearby Apple devices. It uses Bluetooth to locate devices and Wi-Fi to transfer files securely. Just make sure you’re using an iPhone 5 or later, iPad 4 or newer, or have iOS 7 or higher to use AirDrop for photo transfer. Here’s how to transfer photos from iPhone to iPad with help of AirDrop:
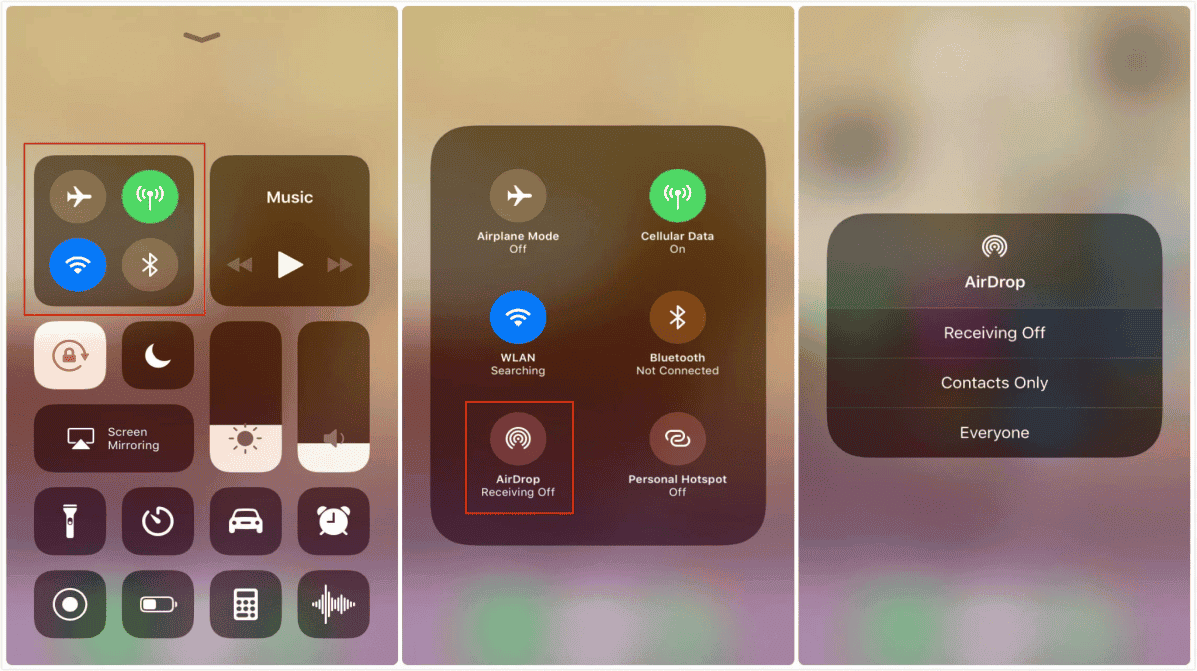
Step 1: switch on Bluetooth and WiFi on both iPhone and iPad. Then, open “Control Center” on both devices.
Step 2: Tap on AirDrop to turn it on and select “Everyone.”
Step 3: In “Photos” app on your iPhone, select pictures you want to transfer. Tap “Share” at bottom left.
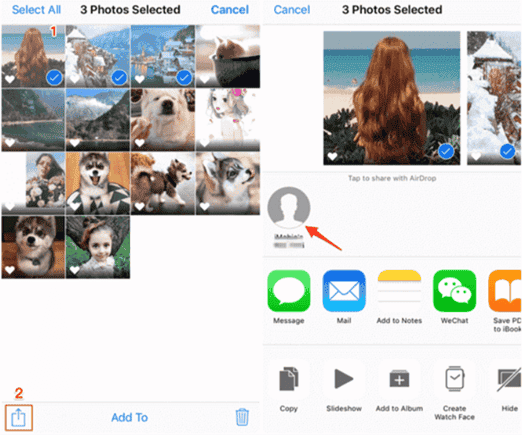
Step 4: Choose your iPad when prompted and accept photo transfer.
Method 4. Move Pictures From iPhone to iPad With Email
Don’t want to move many photos? If you’re particularly looking for how to get pictures from iPhone to iPad conveniently and easily, email is a good option. However, it doesn’t support moving bulky or large-sized pictures. Here’s how to download iPhone photos to iPad with email:
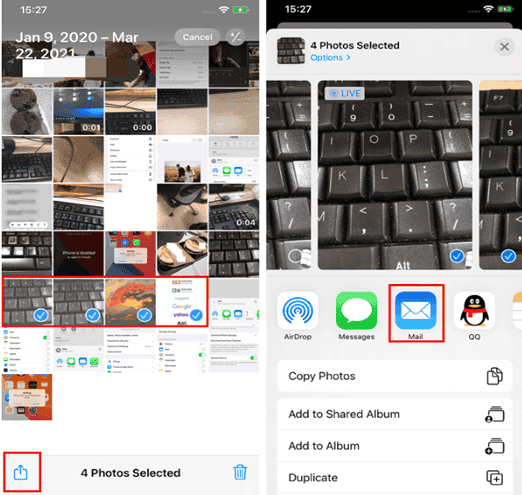
Step 1: Open “Photos” on your iPhone and pick pictures you want to move to your iPad.
Step 2: Tap “Share,” pick “Mail” and enter your email, and send it.
Step 3: Open “Mail” on your iPad, find email that you sent from your iPhone, and download photos from it on your iPad. That’s how to put pics from iPhone to iPad with an email.
Conclusion
Hopefully, we’ve answered your query about, “How do you transfer pictures from iPhone to iPad and vice versa?” You can now move photos in four ways with help of iCloud, AirDrop, Email, and Tenorshare iCareFone.
They’re all effective methods that teach you how to transfer photos from iPhone to iPad but some of them have some limits, except for iCareFone. It stands out because it lets you choose what you transfer between iOS devices and computers. Compared to other methods, it is also faster and has no limitations or strict requirements to use.


