When you're troubleshooting PC hardware issues, finding a red LED light error on your motherboard can cause different reactions. Some may see it as a noticeable visual feature, part of how the motherboard looks, or its RGB lighting setup. But for others, it signals that something might be wrong with their computer.
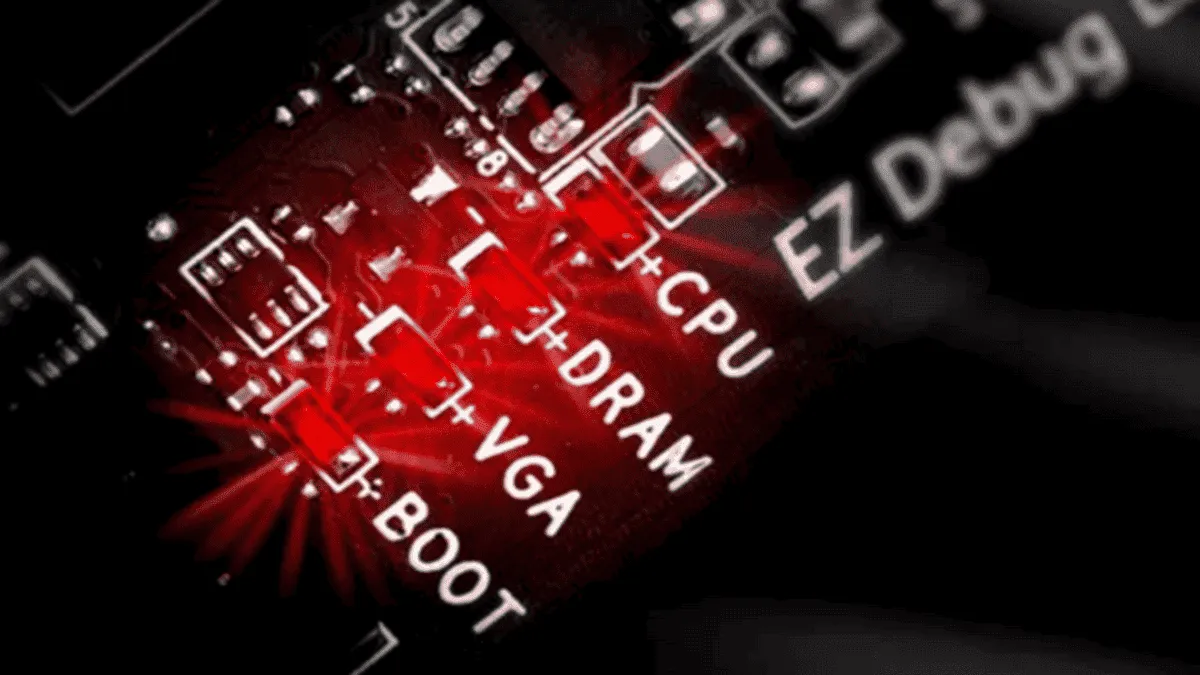
Understanding what a red LED on your PC motherboard means requires careful thought. While it might just be for looks, many motherboards use LEDs to show if there are hardware problems. These LEDs often relate to specific parts like the CPU, RAM, GPU, or power system. A red LED usually means there's an issue with one of these parts, like overheating or a power problem.
If your PC won't turn on or acts strange with a red LED, it's time to investigate. First, check the motherboard manual to see what the LED means. Modern manuals have diagrams and guides that explain the colors and patterns of LEDs.

Then, look over your system. Make sure all cables are plugged in securely and that nothing looks damaged or too hot. Sometimes, a loose cable or small problem can turn on the red LED, even if it's not serious.
If the issue keeps happening, try basic fixes. Depending on your motherboard, a red light can mean different things.
Check The Manual
To understand the meaning of a red LED light on your motherboard, refer to the motherboard's manual. Manufacturers vary in layout and design, so interpretations of these indicators differ widely, even among models from the same maker.
Begin by locating your motherboard's manual, usually included with your PC or motherboard purchase. If you don't have a physical copy, you can find a digital version on the manufacturer's website in the motherboard's support section. These manuals provide detailed information about the motherboard's layout, features, and diagnostic indicators.

Focus on the section that explains LED indicators. Note the location of the red LED and observe its behavior—does it stay on continuously, flash in a pattern, or light up during specific operations like booting?
The manual will clarify what each LED signifies. It may indicate issues with components such as the CPU, RAM, GPU, or power supply, including overheating or connectivity problems. Some motherboards use beep codes or additional LEDs/readouts during boot for diagnostic purposes. Compare any patterns or codes with the troubleshooting section to accurately identify the problem.
The manual might reassure you that the red LED is normal or easily resolved. If uncertain or if the issue persists, contact the manufacturer's customer support for assistance tailored to your motherboard model. They can offer expert guidance to troubleshoot and effectively resolve any persistent issues.
Reset the CMOS
Before trying more complicated solutions for fixing a red LED issue on your motherboard, try resetting the CMOS. This step is helpful when BIOS changes or new hardware installations cause stability problems that prevent your system from starting properly or light up warning signals.

To reset the CMOS, follow these steps:
- Use BIOS Reset Button (if available): Some motherboards have a special button to reset BIOS settings. Pressing it can reset CMOS settings to default without removing any hardware.
- Manual Reset:
- Power Off: Make sure your PC is completely turned off by unplugging the power cable.
- Remove CMOS Battery: Find the small round CMOS battery near the CPU socket on your motherboard.
- Press and Hold Power Button: After removing the CMOS battery, press and hold your PC's power button for about 30 seconds to clear any remaining power and reset the CMOS settings.
- Replace Battery and Cables: Put the CMOS battery back in its place. Reconnect the power cable to your PC.
- Power On: Turn on your computer and check if the red LED issue persists.
Resetting the CMOS restores default settings, which can often fix issues caused by setup mistakes or conflicting hardware changes. If the red LED was caused by such issues, this reset might solve the problem.
After resetting the CMOS, watch your PC during startup to see if the red LED stays on or if the system starts correctly. If the problem continues, further troubleshooting will be needed.
Alternatives to Fix the Red Light Issue on Motherboard
If you suspect the red light on your motherboard indicates a CPU error, here are steps to troubleshoot and potentially resolve the issue:
- Re-install the CPU: Remove the CPU cooler and processor, then reinstall them properly. Follow detailed instructions if needed, like those found in a PC building guide.
- Check CPU Cooling: Ensure the CPU fan spins correctly and that the cooler is securely attached. A loose or malfunctioning cooler can trigger warnings that prevent the motherboard from starting up.
- Update BIOS Firmware: If you've recently installed a new CPU on an older motherboard, it might not be supported without a BIOS update. Try installing a known compatible CPU first, then update the BIOS before reinstalling the new processor. Verify compatibility on your motherboard's support page as well.
- Test the CPU: If possible, test the processor on another PC to confirm it works properly. This helps determine if the issue lies with the CPU itself.

Following these steps can help diagnose and potentially resolve CPU-related red light errors on your motherboard. If problems persist, consulting technical support or a professional technician may be necessary for further assistance.
More Alternatives
If the red light on your PC motherboard persists after troubleshooting, follow these steps:
- Remove unnecessary parts: Disconnect extras like RAM, storage drives, and add-in cards. Only keep essentials like your keyboard and mouse.
- Adjust RAM: If RAM might be the issue, take out and reinsert both sticks. Test each stick one at a time to pinpoint any RAM-related issues.
- Check power connections: Ensure all components, including the graphics card and CPU, have securely connected power cables. Verify the CPU power cable near the top of the motherboard and reconnect if necessary.
- Review connections: Double-check all connections to ensure they are secure. If uncertain, disconnect and reconnect each component to establish a firm connection.
- Consider hardware replacement: If these steps don't resolve the issue and the red light remains, it may indicate a more serious hardware problem. Seek assistance from tech support or a professional technician for further diagnosis and potential hardware replacement.
These steps can help troubleshoot and resolve issues causing the red light on your motherboard. For persistent problems, expert assistance may be necessary.
Conclusion - Fixing the Red Light Error
In conclusion, understanding the red LED light error on your motherboard is crucial for diagnosing PC issues. The first step is to check your motherboard's manual to interpret what the LED indicates. Manufacturers design motherboards differently. For that reason, the interpretations of these indicators vary widely, even among models from the same brand.
Start by locating the manual that came with your PC or motherboard. If you don't have a physical copy, check the manufacturer's website for a digital version under the motherboard's support section. These manuals detail the motherboard's layout, features, and diagnostic indicators.
The manual will clarify what each LED signal means. Hence, it can point to issues with the CPU, RAM, GPU, or power supply. Some motherboards use beep codes or extra LEDs/readouts during boot for further diagnostics. Pay attention to the patterns or codes to accurately pinpoint the problem.
If uncertainty persists or the issue remains unresolved, seek assistance from the manufacturer's customer support. They can provide tailored guidance to effectively troubleshoot and address persistent motherboard LED issues.
Popular News
Latest News
Loading