Don’t Wait for Disaster: Learn How to Check Health and Secure Your SSD Before It’s Too Late
TechMonday, 02 September 2024 at 02:30

Even with a top-tier SSD, eventual failure is inevitable. SSDs operate with a limited number of read and write cycles, and each cycle degrades the NAND flash memory. Over time, this wear will accumulate, leading to failure. Fortunately, reaching the maximum cycle limit is highly unlikely under normal use. However, despite not exhausting the theoretical lifespan, your SSD could still experience issues or fail prematurely due to other factors. Follow this article (via), and learn how to do a good SSD health check before it's too late.
Signs that your SSD might be failing include system crashes, blue screens of death (BSOD), sluggish performance, data loss, and difficulties writing new files. If you notice these symptoms, it’s crucial to act quickly—there may still be time to back up your data. Explore effective methods to test your SSD and ensure your data remains secure.

SSD Health Check Via Windows Settings
For a basic overview of your SSD’s health, you can use Windows Settings. Note that this method provides only a general check, so if you suspect your SSD might be failing, consider using more comprehensive tools later.
- Step 1: Open Windows Settings by pressing the Windows + I keys, then navigate to System > Storage. Alternatively, you can type "Storage" into the Windows Search bar and select Storage Settings.
- Step 2: Scroll down and click on Advanced storage settings, then choose Disks & volumes.
- Step 3: Select your SSD from the list and click Properties. Here, you can view basic details about your SSD, including its estimated remaining life, available space, and temperature. This utility offers a snapshot of your drive's health but lacks more detailed diagnostic features.
Use Windows Command Prompt
For a straightforward "yes or no" check of your SSD’s health, the Windows Command Prompt (CMD) can be useful. This method provides a quick indication of whether your SSD might be failing. If issues are detected, it's crucial to back up your data immediately.
- Step 1: Open the Start Menu, type "Command Prompt," right-click the result, and select Run as administrator.
- Step 2: Enter the following command and press Enter:
wmic diskdrive get status
If the output shows "OK," your SSD is likely in good condition. However, if it displays "Pred Fail," it indicates a potential problem, and you should back up your data and consider more thorough diagnostics.
Use Windows PowerShell
Windows PowerShell offers a more detailed look at your SSD's health compared to Command Prompt. Here’s how you can use it to gather in-depth information about your SSD:
Step 1: Open Windows PowerShell by searching for it in the Start Menu, right-clicking the result, and selecting Run as administrator.
Step 2: Use the following commands to check your SSD’s status:
- Basic Status Check: powershell
Get-PhysicalDisk
This command provides the operational status of your SSD, indicating whether it’s functioning properly.
- Detailed Health Information: powershell
Get-PhysicalDisk | Get-StorageReliabilityCounter | Format-List
This command delivers a comprehensive overview, including current and maximum temperatures, read/write errors, and the SSD's usage history.
If the output columns are empty, you may need to use more advanced tools. You can also tailor the command to display specific information. For example, to check write errors, use:
powershell
Get-PhysicalDisk | Get-StorageReliabilityCounter | Select WriteErrorsTotalUse Third-Party Apps For SSD Health Check
You can also rely on some trustworthy apps for checking the conditions on your SSD. Among the most popular ones, we have CrystalDiskInfo and the HWInfo. Both are great options for checking the current health status of your drive.
CrystalDiskInfo
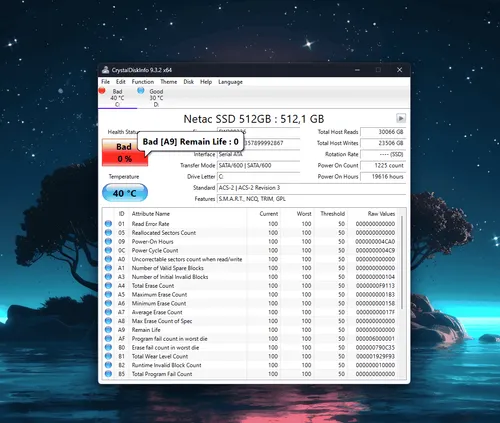
For a thorough assessment of your SSD’s health, CrystalDiskInfo is an excellent, user-friendly tool. It provides detailed insights into your SSD's status, including power-on counts, operational hours, and overall health.
Step 1: Download CrystalDiskInfo from its official website. After downloading, install and launch the application.
Step 2: CrystalDiskInfo offers a straightforward interface with no hidden complexities. It utilizes SMART (Self-Monitoring, Analysis, and Reporting Technology) to monitor your SSD’s health. Upon running the tool, you can quickly assess your SSD's condition.

Key metrics to review include:
- Health Status Percentage: Indicates the overall health of your SSD.
- Power On Count: This shows how many times your SSD has been powered on.
- Power On Hours: Tracks the total operational hours of your SSD.
- Total Host Writes: Provides the total amount of data written to the SSD.
These details will help you gauge whether your SSD is functioning optimally or if it might be nearing the end of its lifespan.
HWiNFO
HWiNFO provides detailed insights into your SSD’s health. Here’s a quick guide:
Step 1: Download HWiNFO from the official website and choose either the installer or the portable version. Install or launch the program and press Start.
Step 2: After opening, you'll see two windows. Close the system summary window for more detailed information.
Step 3: In the main HWiNFO window, click the arrow next to Drives, select NVMe Drives, and choose your SSD. You can view health metrics, spare capacity, and errors.

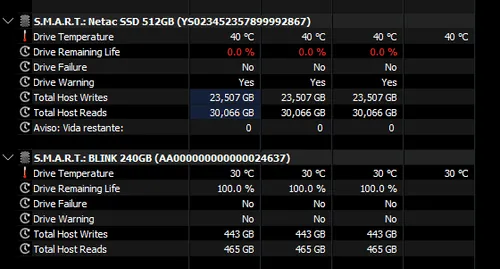
For real-time data, click Sensors and scroll to S.M.A.R.T. followed by your SSD model to see metrics like temperature and read/write totals.
Conclusion
Keeping an eye on your SSD’s health is essential for ensuring data integrity and preventing unexpected failures. Utilizing tools like Windows Settings, Command Prompt, PowerShell, CrystalDiskInfo, and HWiNFO offers a range of insights from basic status checks to detailed diagnostics. Regular monitoring with these tools helps you identify potential issues early, giving you the chance to back up your data and take corrective actions before experiencing major problems. By staying proactive, you can extend the life of your SSD and safeguard your important files.
Loading


