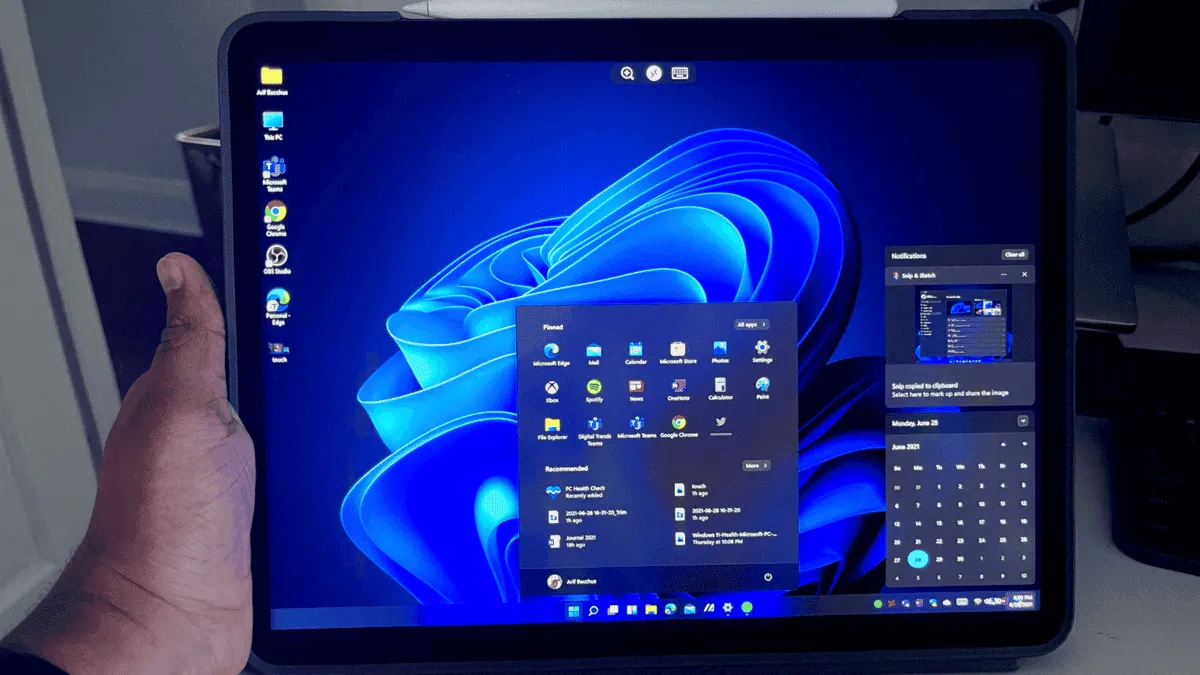
The gap between high-end iPads and top Windows tablets is shrinking. Apple has gradually improved iPadOS with features like Stage Manager, making it closer to a laptop replacement. With iPadOS 18, more useful features have arrived, but it’s still not quite on par with Windows tablets, especially since iPads lack a true desktop environment like Windows 11. However, what you would say about the idea of running Windows on an iPad? Thanks to a new feature it's possible to run Windows 11 on iPad remotely.
However, you can experience the best of both worlds by running Windows on your iPad. While you can’t replace iPadOS with Windows 11 or run it natively, you can access Windows on your iPad with a stable internet connection, without sacrificing performance. This is possible through Remote Desktop or Windows 365, both offering smooth solutions for running Windows on your iPad.
How to Run Windows 11 on iPad Using Remote Desktop
To run Windows 11 on your iPad using Microsoft Remote Desktop, you'll need to use the rebranded Windows App Mobile, which lets you stream your PC to your iPad via the internet. Here’s a step-by-step guide to getting it set up:
- Download Windows App Mobile: Start by downloading the Windows App Mobile app on your iPad from the App Store.
- Prepare your Windows 11 PC: Make sure the Windows 11 PC you want to stream is turned on and connected to the internet. You also need to be running Windows 11 Pro since the Remote Desktop feature is unavailable on Windows 11 Home.
- Enable Remote Desktop:
- Open the Settings app on your Windows 11 PC.
- Navigate to System in the sidebar, and select Remote Desktop.
- Toggle the switch to On and make a note of your PC's name, as you'll need it later to connect your iPad to the PC.

These steps will set up your Windows 11 PC for streaming to your iPad through the Windows App Mobile app.
Once your Windows 11 PC is set up for Remote Desktop, follow these steps to connect your iPad to it:
- Open the Windows App Mobile: On your iPad, launch the Windows App Mobile app.
- Connect to the same Wi-Fi: Ensure both your iPad and Windows PC are connected to the same Wi-Fi network for a seamless connection.
- Add your PC:
- Tap the + icon at the bottom of the app screen.
- Select Add PC from the menu.
- In the PC Name field, enter the name of your PC (the one you noted earlier in the Remote Desktop settings).
This will connect your iPad to your PC, allowing you to run Windows 11 on your iPad using Remote Desktop.

After adding your PC name, follow these steps to set up your user account and finalize the connection:
- Under User Account: Tap Add User Account.
- Enter Account Info: Input the username and password from your primary Windows 11 PC.
- Optional - Give Your PC a Friendly Name: You can create a nickname for the PC to make it easier to identify.
- Save: Press the Save button to store the settings.
Your iPad will now be ready to connect to your Windows PC, and you can access and control it from the iPad through the Windows App Mobile. After completing the initial setup, follow these steps to finalize your remote session:
- Press the Back Button: Return to the main screen of the app.
- Select Sound: Set it to Play on this device to hear the audio from your PC on your iPad.
- Turn On Toggles: Enable the toggles for Microphone, Camera, Clipboard, and Storage to allow access to these features.
- Press Save: Store your settings.
- Select Your PC: Tap the icon for your PC from the list.
Your remote session will now begin, allowing you to control your Windows PC from your iPad. To end the session at any point, tap the Microsoft Remote Desktop icon on the left of the screen, and choose Disconnect all PC sessions.
Keep in mind that this is a remote connection, so you may experience some input lag depending on your internet speed. However, you should still be able to perform common tasks like web browsing, document editing, and even some light video editing if your PC has powerful enough hardware.
How to run Windows 11 on an iPad with Windows 365
To run Windows 11 on your iPad using Windows 365, follow these steps:
- Sign Up for Windows 365: On another device, visit the Windows 365 sign-up page and browse the available plans. Windows 365 offers different subscription tiers based on the power and storage you need.
- Select a Plan: Choose a plan that suits your requirements and budget, then click Buy Now.
- Create a Business Account: Follow the prompts to set up a business account if you don’t have one already. Windows 365 is mainly a business-focused service, but anyone can sign up.
- Complete the Purchase: Finish the transaction by entering your payment details.
Once you've subscribed and set up your cloud PC, you can access it from your iPad.
Access Windows 365 on iPad
If you don’t have a Windows PC but still want to run Windows 11 on your iPad, an alternative is to use Windows 365. This cloud-based service, primarily designed for businesses, allows anyone to create a virtual PC in the cloud. By subscribing, you can access a fully functional Windows 11 machine from any device, including your iPad, phone, or other devices. With Windows 365, you're essentially renting a computer that exists entirely in the cloud, and you can access it from anywhere with an internet connection. This setup provides the flexibility of using Windows 11 without owning a physical Windows device
To get started with Windows 365 on your iPad, you'll need to sign up using another device, such as a computer or phone. Follow these steps:
- Create a Microsoft 365 business account by following the on-screen instructions during sign-up.
- Add a payment method when prompted, but don't worry—you won't be charged for the first month.
- On another device, visit windows365.microsoft.com.
- Look for the download icon in the sidebar and click on it.
- Next to Microsoft Remote Desktop for iOS, select Get Subscription URL.
- Note the URL for use on your iPad later.
- Download the Windows App Mobile app from the App Store.
- Open the app, then tap the + icon and select Add Workspace.
- Enter the URL provided by your Windows 365 setup earlier.
- Once done, your cloud PC will appear under the Workspaces section.
- Click the cloud PC to launch it.
With an active internet connection, you can access and use this cloud PC just like a regular Windows computer. Since it's in the cloud, there's no need to ensure your physical computer is on or running; simply open Remote Desktop whenever you want to use Windows 11 on your iPad. The setup even adapts to your iPad’s screen resolution, ensuring a seamless experience.


Loading